NETGEAR EAX20 – AX1800 WiFi 6 Mesh Extender
 Desktop High-Power Tower
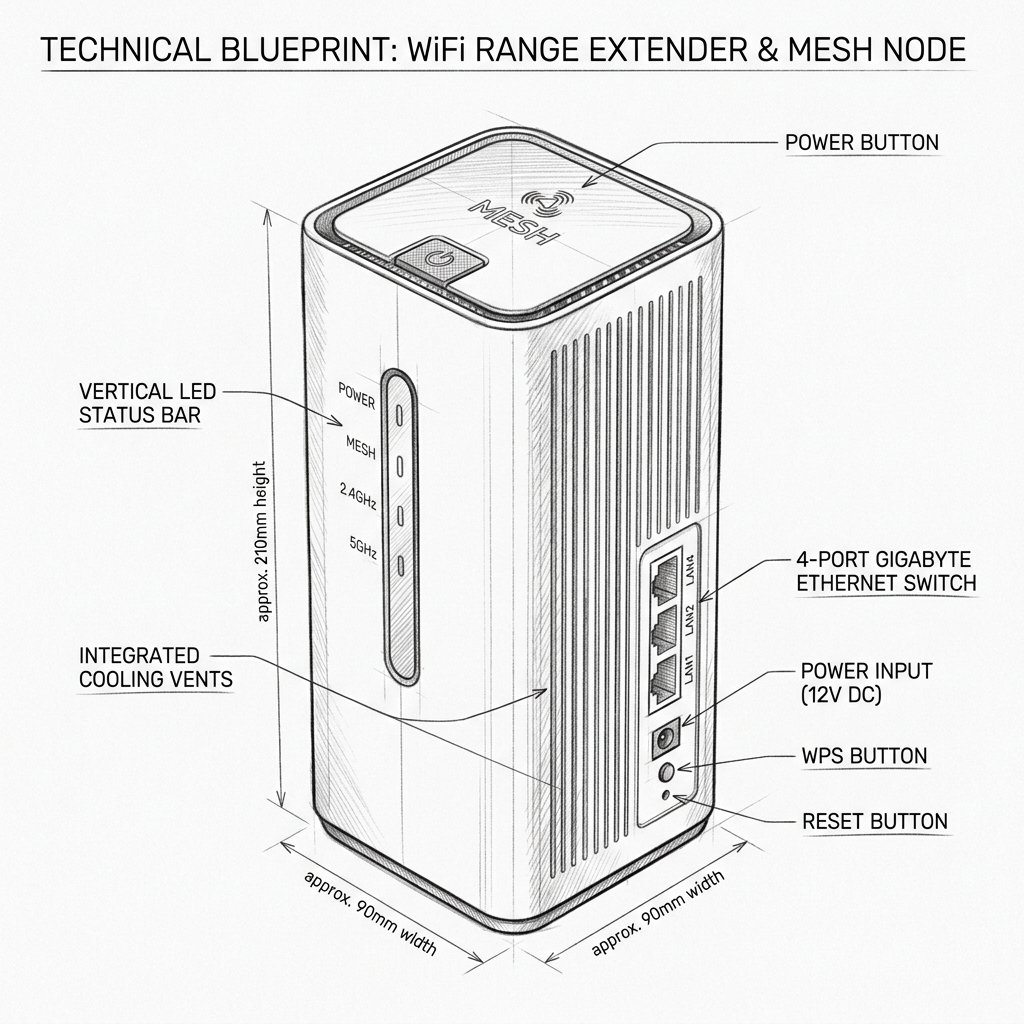
Netgear EAX20 Diagram
Reference this technical blueprint during setup to locate the power input, status LED indicators, one-touch WPS pairing button, and Ethernet port on your device.
The NETGEAR EAX20 AX1800 WiFi 6 mesh extender is designed to expand coverage, reduce dead zones, and deliver smoother streaming and gaming in modern WiFi 6 homes. Use this guide to set up, reset, and troubleshoot your EAX20 quickly and accurately.
Quick 3-Step Checklist
- Restart: Unplug the extender, wait 15 seconds, and plug it back in.
- Reconnect: Make sure your phone or laptop is connected to the extender’s WiFi before opening the setup page.
- Verify router internet: Connect directly to your router WiFi and confirm the internet is working there first.
EAX20 AX1800 WiFi Extender Overview
- WiFi standard: WiFi 6 (802.11ax), AX1800 dual-band.
- Form factor: Desktop mesh extender with internal antennas.
- Best for: Medium to large homes, 4K streaming, online gaming, and multi-device WiFi 6 environments.
- Typical use: Single seamless WiFi name (mesh) across your home, with optional separate extended SSID if needed.
How to Set Up NETGEAR EAX20 via Nighthawk App
This is the recommended, most user-friendly setup method.
Step 1: Plug In and Power On
- Place the EAX20 near your main router for initial setup.
- Plug it into a power outlet and wait until the Power LED turns solid.
Step 2: Connect Your Phone to the Extender
- On your phone, open WiFi settings.
- Connect to the extender’s default WiFi network (shown on the label under the unit).
- If it does not appear immediately, wait 30–60 seconds and refresh the WiFi list.
Step 3: Install and Open the Nighthawk App
- Install the NETGEAR Nighthawk App from the App Store or Google Play.
- Open the app and sign in with your NETGEAR account or create a new one.
Reality Check: If the app hangs on “searching for your extender” for more than a minute or two, force close the app, toggle Bluetooth off and back on, then reopen the app and try again. If it still fails, use the browser setup method described below.
Step 4: Start Guided Setup
- In the app, tap Set Up a New Device → select Range Extender.
- Choose EAX20 if prompted and follow the on-screen instructions.
Step 5: Connect the Extender to Your Router
- The app scans for nearby WiFi networks.
- Select your router’s SSID (WiFi name).
- Enter your router’s WiFi password exactly (case-sensitive).
Step 6: Choose WiFi Name and Mesh Behavior
- Recommended: Use one WiFi name so the EAX20 and router share the same SSID and password for seamless mesh roaming.
- Optional: Create a distinct extended SSID (for example, HomeWiFi_EXT) if you want a clearly separate network.
Step 7: Place the Extender in the Ideal Spot
- Think of the extender as a relay runner: it must be close enough to the router to catch a strong signal before passing it on.
- Move the EAX20 to a location roughly halfway between the router and the dead zone.
- Aim for 2–3 bars of router signal in that area; if link indicators show weak signal, move the extender a little closer to the router.
Step 8: Test WiFi Coverage
- Go to the previously weak area and connect to your WiFi.
- Run a speed test, stream a video, or join a video call to confirm stability.
How to Set Up NETGEAR EAX20 via Browser (mywifiext)
Use this method if you prefer a browser or if the Nighthawk app cannot detect the extender.
Step 1: Plug In and Connect
- Plug the EAX20 into a power outlet near your router and wait for the Power LED to go solid.
- Connect a laptop, phone, or tablet to the extender’s default WiFi network.
Step 2: Open the Setup Page
- Open a web browser and type http://mywifiext.net in the address bar.
- If that does not load, try http://mywifiext.local or the fallback IP 192.168.1.250.
Reality Check: If the setup page will not open, make sure you are connected to the EAX20’s WiFi, not the router’s WiFi.
Step 3: Run the Setup Wizard
- Once the page loads, choose New Extender Setup.
- Sign in with or create your NETGEAR account if prompted.
- Allow the wizard to scan for available WiFi networks.
Step 4: Link the EAX20 to Your Router
- Select your router’s SSID for both 2.4 GHz and 5 GHz (if shown).
- Enter your router’s WiFi password correctly for each band.
Step 5: Configure the Extended Network
- Choose whether to:
- Mirror your router SSID (single WiFi name for mesh roaming), or
- Use a different extended SSID (for example, HomeWiFi_EXT).
- Save your settings and wait while the EAX20 reboots.
Step 6: Move to Final Location
- Unplug the extender and move it to a wall outlet roughly halfway between the router and the dead zone.
- Plug it in, wait for LEDs to stabilize, and test WiFi performance in the problem area.
How to Set Up NETGEAR EAX20 via WPS
If your router supports WPS, this button-based method is the quickest.
Step 1: Power On the Extender
- Plug the EAX20 into a wall outlet near your router.
- Wait until the Power LED is solid.
Step 2: Press WPS on the Extender
- Press the physical WPS button on the EAX20.
- The WPS LED will begin blinking.
Step 3: Press WPS on the Router
- Within two minutes, press the WPS button on your router.
- Wait for the extender and router to complete pairing.
Step 4: Check Signal and Adjust Placement
- Check the extender’s signal indicators (or use the Nighthawk app) to confirm a good link.
- If the signal is weak, move the extender closer to the router and test again.
Smart Roaming and WiFi Name Options
- Single SSID (recommended): The router and EAX20 share one WiFi name, letting devices roam automatically between them.
- Separate SSID: Use a distinct extended network name if you want manual control or testing.
- If you don’t see a separate _EXT network after setup, that’s normal when using a single SSID mesh configuration.