NETGEAR EXS27 – BE5000 WiFi 7 Dual-Band Extender
 Internal-Antenna Mesh Extender
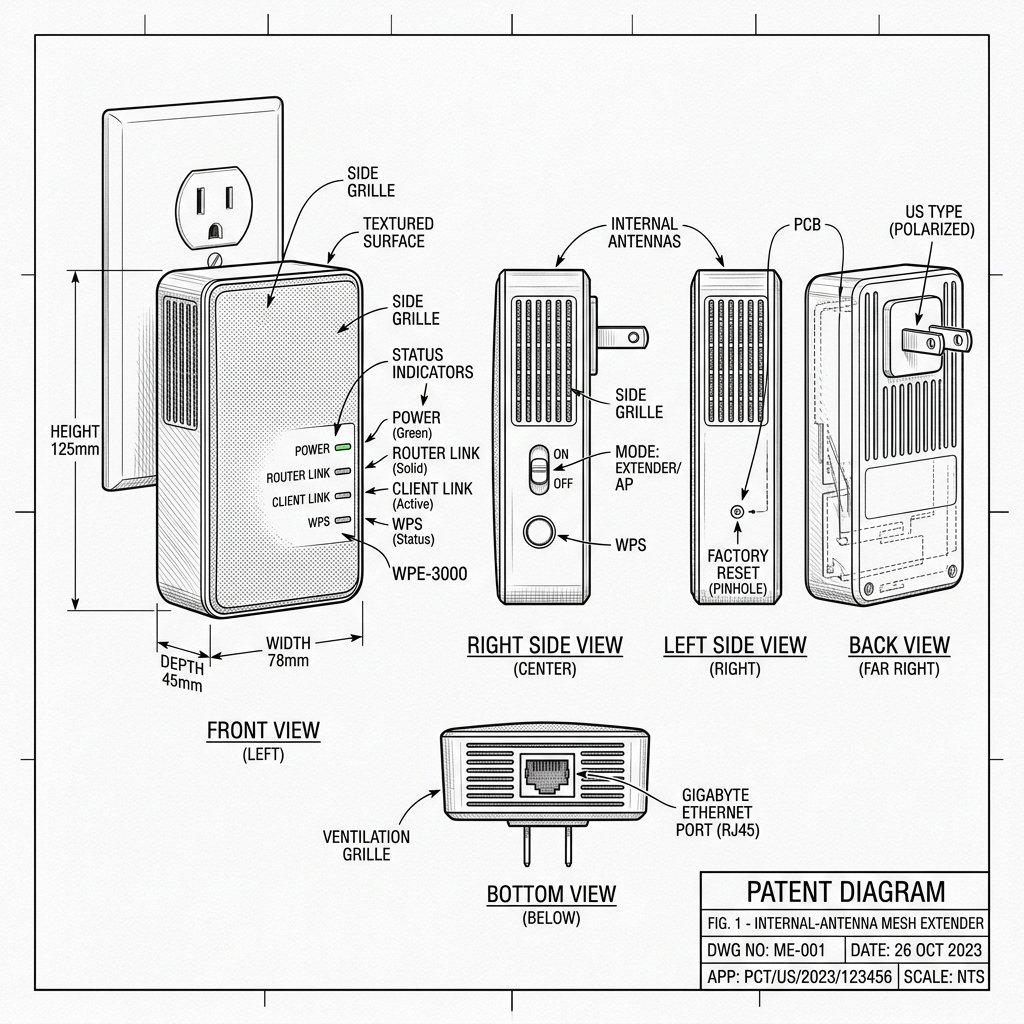
Netgear EXS27 Diagram
Reference this technical blueprint during setup to locate the power input, status LED indicators, one-touch WPS pairing button, and Ethernet port on your device.
Setup Guide, Reset Instructions & Troubleshooting FAQ
The NETGEAR EXS27 BE5000 is a WiFi 7 dual-band Nighthawk extender designed to deliver higher speeds, better roaming, and more reliable coverage in medium to large homes. It’s ideal for 4K/8K streaming, gaming, and connecting multiple devices in rooms where your router’s signal drops off. This guide is written for real-world use: short steps, bold actions, and practical tips you can follow while standing next to your router.
Quick 3-Step Checklist
Try these before deep troubleshooting:
- Restart: Unplug the extender, wait 15 seconds, plug it back in.
- Reconnect: Make sure your phone or laptop is connected to the EXS27’s Wi-Fi before opening any setup page.
- Verify router internet: Connect a device directly to your router’s Wi-Fi and confirm the internet works there first.
Product Overview
- Wi-Fi standard: WiFi 7 / BE5000 dual-band
- Form factor: Wall-plug Nighthawk extender with status LEDs and an Ethernet port
- Best for: Larger homes, WiFi 7 or high-end WiFi 6 routers, heavy streaming/gaming, and eliminating dead zones
- Typical use: One seamless Wi-Fi name across the home (Smart Roaming), with the option of a separate extended SSID if you prefer
How to Set Up EXS27 via Nighthawk App
This is the easiest and most guided setup method.
- Plug in and power up
Plug the EXS27 into a wall outlet near your main router. Wait until the Power LED turns solid (no longer blinking). - Connect your phone to the extender
On your phone, open Wi-Fi settings. Connect to the EXS27’s default Wi-Fi network (shown on its label). If you don’t see it immediately, wait 30–60 seconds and refresh the Wi-Fi list. - Install and open the Nighthawk App
Install the NETGEAR Nighthawk App from the App Store or Google Play. Open the app and sign in with your NETGEAR account (or create one).Reality Check: Sometimes the Nighthawk app gets stuck “searching for your extender.” If it spins for more than 1–2 minutes, force-close the app, toggle Bluetooth off and on, reopen the app, and try again. If it still fails, use the browser setup method below.
- Start the guided setup
In the app, tap Set Up a New Device (or similar) → choose Range Extender. Select EXS27 if prompted and follow the on-screen instructions. - Connect to your router
The app will scan for nearby networks. Select your router’s Wi-Fi name (SSID). Enter your router’s Wi-Fi password carefully (case-sensitive). - Choose Wi-Fi name & roaming
Recommended: Keep one Wi-Fi name so the EXS27 and router share the same SSID and password, enabling Smart Roaming.
Optional: Create a separate extended name likeHomeWiFi_EXTif you want to manually choose between router and extender. - Place the extender in the ideal spot
Think of the EXS27 like a relay runner: it must be close enough to your router to “catch” a strong signal before passing it on. Move it to a wall outlet roughly halfway between the router and the dead zone. If the signal LED or app indicates a weak link, move it a bit closer to the router. - Test your improved coverage
Go to the previously weak area and connect to your Wi-Fi. Run a speed test or stream HD/4K video to confirm smoother performance.
How to Set Up EXS27 via Browser (mywifiext)
Use this if you prefer a browser or if the app has trouble finding the extender.
- Plug in and connect
Plug the EXS27 into a wall outlet near your router. Wait for the Power LED to become solid. Connect your phone, laptop, or tablet to the EXS27’s default Wi-Fi network. - Open the setup page
Open a browser and typehttp://mywifiext.netin the address bar. If that doesn’t open, tryhttp://mywifiext.localor192.168.1.250.Reality Check: If the page fails to load, you’re probably still connected to the router’s Wi-Fi. Make sure you’re connected to the EXS27’s network, then try again.
- Log in and run the setup wizard
When the setup page loads, choose New Extender Setup. Log in or create a NETGEAR account if prompted. The wizard will scan and show nearby Wi-Fi networks. - Link the extender to your router
Select your router’s SSID from the list (for both 2.4 GHz and 5 GHz if shown). Enter the correct Wi-Fi password for each band. - Configure your extended network
Choose between:
Same Wi-Fi name as your router (Smart Roaming), or
A different extended SSID (e.g.,HomeWiFi_EXT).
Save your settings and wait while the EXS27 reboots. - Move to final position
Unplug the extender and move it to the halfway point between router and dead zone. Plug it back in, wait for LEDs to stabilize, and test coverage.
How to Set Up EXS27 via WPS
If your router supports WPS, this is a simple button-based method.
- Power and prepare
Plug the EXS27 into a wall outlet near the router. Wait until the Power LED is solid. - Press WPS on the extender
Press the WPS button on the EXS27. The WPS LED will start blinking to show it’s in pairing mode. - Press WPS on the router
Within 2 minutes, press the WPS button on your router. Wait for the EXS27 to finish pairing. - Check signal status
Once connected, check the Signal LED on the EXS27:
Solid blue: good location and strong signal.
Solid red: signal is too weak; move the extender closer to the router and try again. - Test and finalize
Move to the problem area, connect to the Wi-Fi, and run a quick test to confirm performance.
Smart Roaming & Network Names
The EXS27 is designed to support Smart Roaming, so your router and extender can share one Wi-Fi name:
- With one SSID, your devices automatically connect to whichever (router or extender) has the stronger signal, reducing drops and manual switching.
- If you don’t see a
_EXTnetwork after setup, that’s likely because you chose the same Wi-Fi name – this is expected. - If you prefer manual control or testing, configure a distinct extended SSID when running setup.