NETGEAR EX6110 – AC1200 Dual Band WiFi Range Extender
 Internal-Antenna Mesh Extender
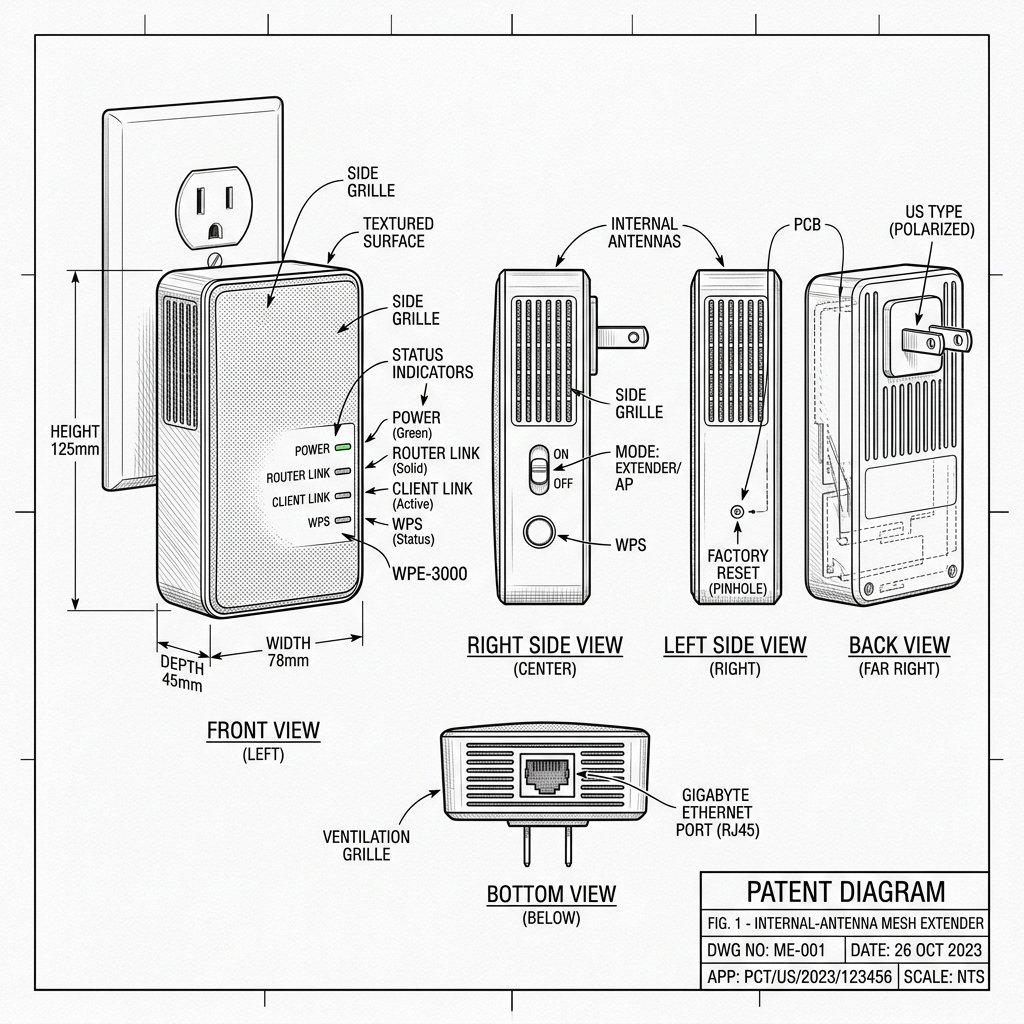
Netgear EX6110 Diagram
Reference this technical blueprint during setup to locate the power input, status LED indicators, one-touch WPS pairing button, and Ethernet port on your device.
The NETGEAR EX6110 AC1200 Dual Band WiFi Range Extender is a compact wall-plug extender that boosts your existing WiFi coverage with dual-band AC speeds up to 1200 Mbps, ideal for HD video streaming and gaming in homes with dead zones or weak WiFi areas.
Quick 3-Step Checklist
- Restart: Unplug the EX6110, wait 15 seconds, and plug it back in.
- Reconnect: Make sure your phone, laptop, or PC is connected to the extender’s WiFi (NETGEAR_EXT or the extended SSID) before opening the setup page.
- Verify router internet: Connect directly to your main router’s WiFi and confirm that the internet works there first.
EX6110 AC1200 Dual Band WiFi Range Extender Overview
- WiFi standard: 802.11ac dual-band AC1200, typically up to 300 Mbps on 2.4 GHz and up to 867 Mbps on 5 GHz.
- Form factor: Compact wall-plug design with internal antennas and front-facing LEDs (Note: This model does not feature an Ethernet port).
- Best for: Extending WiFi from any standard router into bedrooms, living rooms, home offices, and upper floors where signal is weak.
- Features: Dual-band connectivity, FastLane-style use of both bands for performance, WPS and manual (browser) setup options.
How to Set Up NETGEAR EX6110 via WPS
Use WPS if your router has a WPS button. It’s the quickest way to connect the EX6110 to your existing WiFi network.
Step 1: Place and Power On
- Plug the EX6110 into a wall outlet in the same room as your WiFi router for initial setup.
- Wait for the Power LED on the extender to turn solid green.
- If the Power LED stays off, press the Power/On-Off button once.
Step 2: Press WPS on the Extender
- Press and hold the WPS button on the EX6110 until the WPS LED starts blinking.
- The blinking WPS LED means the extender is ready to pair with your router.
Step 3: Press WPS on the Router
- Within two minutes, press the WPS button on your router or gateway.
- Wait for up to two minutes while the devices establish a secure connection.
- When successful, the WPS and Router/Link LEDs on the EX6110 will turn solid (often green), showing it is connected to your router’s WiFi.
Step 4: Optional – Connect 5 GHz Band
- If your router supports 5 GHz, repeat WPS for the 5 GHz band:
- Press WPS on the extender again, then press WPS on the router within two minutes.
- Confirm that the 5 GHz LED on the EX6110 becomes solid, indicating a successful 5 GHz link.
Step 5: Move the EX6110 to the Ideal Location
- Think of the EX6110 as a relay runner: it must sit where it still receives a strong signal from the router so it can pass that signal further out.
- Unplug the extender and move it to a location roughly halfway between your router and the area with weak WiFi.
- Plug it back in, wait for the LEDs to stabilize, and check the Link/Signal LED:
- Green: Best connection.
- Amber: Fair connection.
- Red/off: Poor connection; move closer to the router.
Step 6: Connect Your Devices
- Your extender’s WiFi name will usually be your router’s SSID with _EXT added.
- Use the same WiFi password as the router unless you changed it during setup.
- Connect laptops, phones, smart TVs, or consoles to this extended network and test performance in the previously weak area.
How to Set Up NETGEAR EX6110 via Browser (mywifiext)
Use browser-based setup if WPS is unavailable or you prefer full control over SSIDs and passwords.
Step 1: Plug In and Connect to NETGEAR_EXT
- Plug the EX6110 into a wall outlet near your router and wait until the Power LED is solid.
- On your phone, tablet, or computer, open WiFi settings and connect to the extender’s default SSID, typically NETGEAR_EXT or similar.
Step 2: Open the Setup Page
- Open a browser (Chrome, Edge, Firefox, Safari, etc.).
- In the address bar (not the search box), type http://mywifiext.net and press Enter.
- If that does not load, try http://mywifiext.local or the extender IP such as 192.168.1.250.
Reality Check: If you see a search results page instead of the extender setup portal, the address was entered in a search field—type it directly into the browser’s address bar.
Step 3: Log In and Start New Extender Setup
- When the NETGEAR Genie / setup portal opens, click NEW EXTENDER SETUP.
- Create an account or log in if prompted.
- For admin login, the default credentials are often:
- Username: admin
- Password: password (unless previously changed)
- You may be asked to change the default admin password and set security questions for safety.
Step 4: Connect to Your Router’s WiFi
- The wizard will scan for nearby wireless networks and display available SSIDs.
- Select your home router’s SSID(s) for 2.4 GHz and 5 GHz if applicable.
- Enter your router’s WiFi password exactly (case-sensitive) to let the extender join your main WiFi network.
Step 5: Configure Extended SSID and Password
- Accept the default extended SSID names (usually your router’s SSID with _EXT) or set custom names.
- Choose a strong password for the extended network; many users keep this the same as the router’s password for simplicity.
- Save your settings and allow the EX6110 to apply changes and reboot if prompted.
Step 6: Move to Final Location and Test
- Unplug the EX6110 and relocate it to a spot halfway between your router and the weak zone.
- Plug it in, wait for the LEDs to show a good link, and then connect your devices to the extended SSID.
- Test WiFi in the problem area with streaming or a speed test to confirm improvement.
Smart Roaming and WiFi Name Options
- Matching SSID (One WiFi Name): Use the same WiFi name and password on the extender as on the router for a mesh-like roaming experience where devices can move more smoothly between router and extender.
- Separate _EXT SSID: Keep the default extended SSID with _EXT if you want manual control over which devices use the extender—for example, connecting only TVs or consoles to the EX6110.
Quick Fix Checklist
- Restart both router and EX6110.
- Verify the router’s WiFi has a working internet connection.
- Make sure your device is connected to the extender’s SSID before visiting mywifiext.net.
- Try WPS setup first; if it fails, use the browser-based setup wizard.
- If issues persist, perform a factory reset and set up the extender again from scratch.
Placement Tips for Best Performance
- Plug the EX6110 into an open outlet—not behind furniture or inside cabinets.
- Aim for a location where the extender’s Link/Signal LED shows green, indicating a strong connection to your router.
- Keep the extender away from microwaves, baby monitors, cordless phones, large mirrors, metal cabinets, fridges, and thick concrete or brick walls.