NETGEAR EX6150 – AC1200 WiFi Range Extender
 Dual-Antenna Range Extender
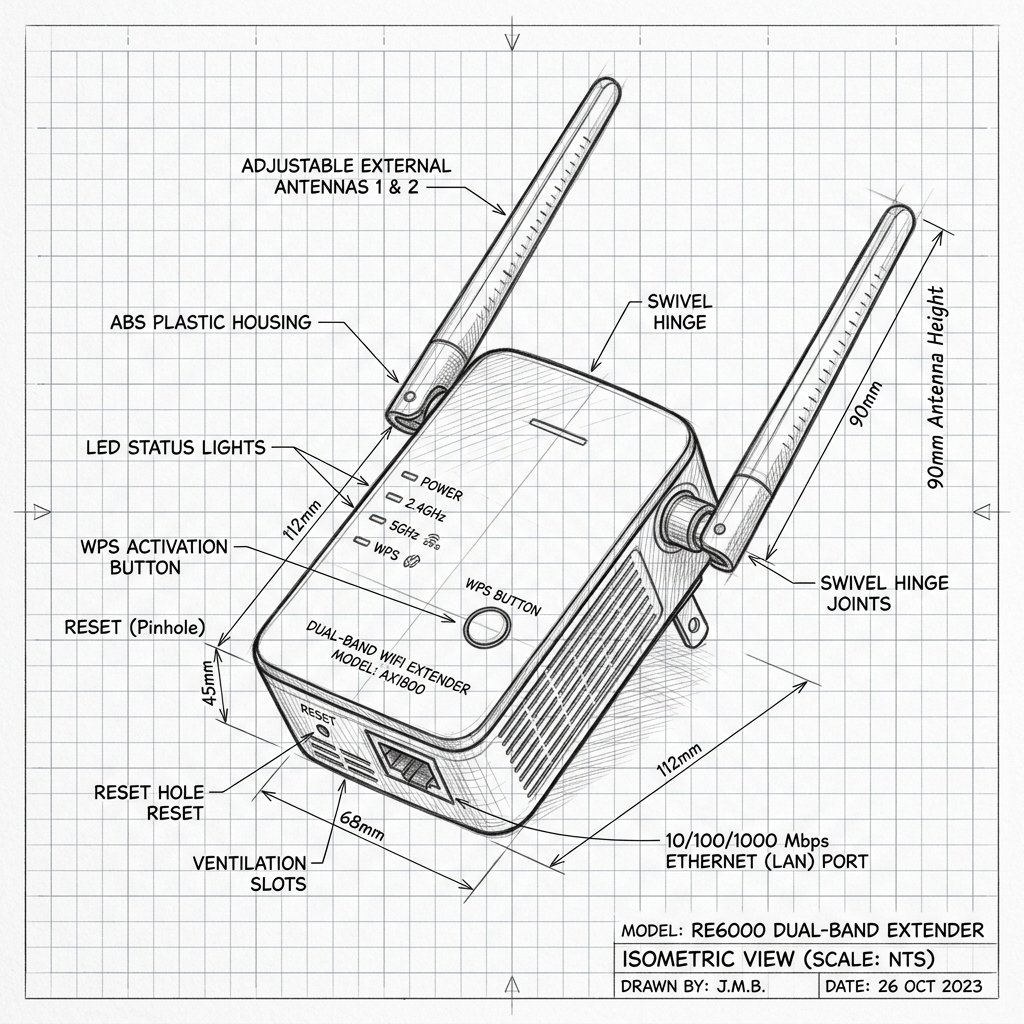
Netgear EX6150 Diagram
Reference this technical blueprint during setup to locate the power input, status LED indicators, one-touch WPS pairing button, and Ethernet port on your device.
The NETGEAR EX6150 AC1200 WiFi Range Extender is a wall-plug dual-band extender designed to boost your existing WiFi coverage up to AC1200 speeds, ideal for HD video streaming and gaming in homes with weak spots or dead zones.
Quick 3-Step Checklist
- Restart: Unplug the EX6150, wait 15 seconds, and plug it back in.
- Reconnect: Make sure your phone, laptop, or PC is connected to the extender’s WiFi (NETGEAR_EXT or the extended SSID) before opening the setup page.
- Verify router internet: Connect directly to your main router’s WiFi and confirm the internet works there first.
EX6150 AC1200 WiFi Range Extender Overview
- WiFi standard: 802.11ac AC1200 dual-band, up to 300 Mbps on 2.4 GHz and 867 Mbps on 5 GHz.
- Form factor: Compact wall-plug design with external antennas, LED indicators, and a Gigabit Ethernet port for wired devices.
- Best for: Extending WiFi from any standard router into distant rooms, upstairs/downstairs, and home offices, supporting multiple devices including laptops, phones, smart TVs, and consoles.
- Modes: Can work as a standard range extender or as an access point when connected by Ethernet to your router.
How to Set Up NETGEAR EX6150 via WPS
Use the WPS method if your router supports WPS. It is the fastest way to link the EX6150 to your existing WiFi.
Step 1: Place and Power On
- Plug the EX6150 into a power outlet in the same room as your router for initial setup.
- Wait for the Power LED to stop blinking and turn solid green.
- If the Power LED does not light, press the On/Off button on the side panel.
Step 2: Press WPS on the Extender
- Press and hold the WPS button on the EX6150 until the WPS LED starts blinking.
- The extender enters WPS pairing mode and is ready to connect to your router.
Step 3: Press WPS on the Router
- Within two minutes, press the WPS button on your wireless router.
- Wait for about two minutes while the EX6150 connects.
- When the connection succeeds, the WPS LED and Router/Link LED on the extender turn solid green.
Step 4: Connect 5 GHz (Optional)
- If your router supports 5 GHz, repeat the WPS process to connect the EX6150 on that band too:
- Press WPS on the extender again, then press WPS on the router within two minutes.
- Confirm the 5 GHz LED turns solid to show a successful connection.
Step 5: Move the Extender to the Ideal Spot
- Think of the EX6150 as a relay runner — it needs a strong signal from the router to pass coverage onward.
- Unplug the extender and move it to a spot roughly midway between your router and the area with weak WiFi.
- Plug it in and check the Link Rate LED:
- Green: Excellent connection to the router.
- Amber: Fair connection; acceptable but could be better.
- Red/off: Too far from the router—move closer.
Step 6: Connect Your Devices
- Your extender’s WiFi name will usually be your router’s SSID with _EXT added.
- Use the same WiFi password as your router unless you changed it during setup.
- Connect devices like laptops, phones, and smart TVs to this extended network and test the improved coverage.
How to Set Up NETGEAR EX6150 via Browser (mywifiext)
Use browser-based setup if WPS is not available or you want more control over network names and passwords.
Step 1: Plug In and Connect to NETGEAR_EXT
- Plug the EX6150 into an outlet near your router and wait for the Power LED to become solid.
- On your phone, tablet, or computer, open WiFi settings and connect to the extender’s default network, typically named NETGEAR_EXT.
- You can also connect a computer to the extender’s Gigabit Ethernet port using a LAN cable.
Step 2: Open the Setup Page
- Launch any web browser such as Chrome, Edge, Firefox, or Safari.
- In the address bar (not the search box), type http://mywifiext.net and press Enter.
- If the page does not appear, try http://mywifiext.local or 192.168.1.250 in the address bar.
Tip: If you see a search result instead of the extender login page, it means the address was entered into a search field. Always type these addresses in the browser’s address bar.
Step 3: Log In and Start the Wizard
- When prompted, log in to the extender. For first-time setup, default credentials are often:
- Username: admin
- Password: password (unless changed)
- You may be asked to change the default admin password and set security questions—complete this for security.
- Click NEW EXTENDER SETUP to launch the installation wizard.
Step 4: Choose Extender Mode vs Access Point Mode
- When asked, select WiFi RANGE EXTENDER if you want to extend your existing router’s wireless network.
- Select ACCESS POINT mode only if you plan to connect the EX6150 to your router via Ethernet and use it as a wired AP (covered later).
Step 5: Connect to Your Router’s WiFi
- The wizard will scan for nearby WiFi networks and show a list of available SSIDs.
- Select your home router’s SSID (for both 2.4 GHz and 5 GHz if applicable).
- Enter your router’s WiFi password exactly (case-sensitive) to allow the extender to connect.
Step 6: Name the Extended Network
- Choose whether to keep the default extended SSID (your router’s SSID + _EXT) or create a custom name.
- Set a secure password. You can keep it the same as the router’s WiFi password to make things simple.
- Click Next and wait while the extender saves settings and reboots if needed.
Step 7: Move to Final Location and Test
- After configuration, unplug the EX6150 and move it to a location halfway between the router and your dead zone.
- Plug it back in, wait for LEDs to stabilize, and use the Link LED to confirm a good connection.
- Connect your devices to the extended SSID and test WiFi in the target area.
How to Use NETGEAR EX6150 as an Access Point (Wired Mode)
Access Point (AP) mode is useful when you can run an Ethernet cable from your router to the extender and want a strong, wired backhaul.
Step 1: Prepare and Reset if Necessary
- If the EX6150 was previously used as a range extender, you can reset it to factory defaults before switching modes (see reset section below).
- Ensure your router has a free LAN port available.
Step 2: Connect Ethernet Cable
- Plug the EX6150 into a wall outlet near your router or in the area where you want WiFi coverage.
- Connect an Ethernet cable from a LAN port on your router to the Ethernet port on the EX6150.
Step 3: Log In and Select Access Point Mode
- Connect your computer or phone to NETGEAR_EXT or via Ethernet to the extender.
- Open a browser, go to mywifiext.net or 192.168.1.250, and log in.
- During setup, choose ACCESS POINT mode.
Step 4: Configure AP WiFi Settings
- Set a WiFi network name (SSID) for the access point (you can match your router’s SSID or choose a new one).
- Choose a strong security type (WPA2/WPA3 depending on compatibility) and set a secure password.
- Save settings; the EX6150 will broadcast WiFi using your router’s internet over the Ethernet backhaul.
Note: In AP mode, the Ethernet cable from the router to the EX6150 must stay connected for WiFi to work.
Smart Roaming and WiFi Name Options
- One WiFi Name (matching SSID): Use the same SSID and password on the extender as on your router to create a more seamless roaming experience. Devices can more easily switch between router and extender as you move around.
- Separate _EXT SSID: Keep the default extended network with _EXT appended if you want manual control over which devices connect to the extender, such as assigning smart TVs or game consoles specifically to the extender network.
Quick Fix Checklist
- Restart both router and EX6150.
- Verify the router itself has an active internet connection.
- Make sure your device is connected to the extender’s SSID before trying mywifiext.net.
- Try WPS setup first; if it fails, use the browser-based wizard.
- If problems persist, perform a factory reset and set up the extender again.
Placement Tips for Best Performance
- Place the EX6150 in an open outlet, not hidden behind furniture or inside a cabinet.
- Aim for a spot where the extender’s Link LED is green, indicating a strong connection to the router.
- Keep the extender away from microwaves, baby monitors, cordless phones, large mirrors, metal cabinets, and thick brick or concrete walls.
- For devices like smart TVs or game consoles, consider wiring them to the EX6150’s Gigabit Ethernet port once the extender has a strong wireless link to the router for more stable performance.