Plume SuperPod – Adaptive Mesh WiFi System
 Mesh Node / Pod
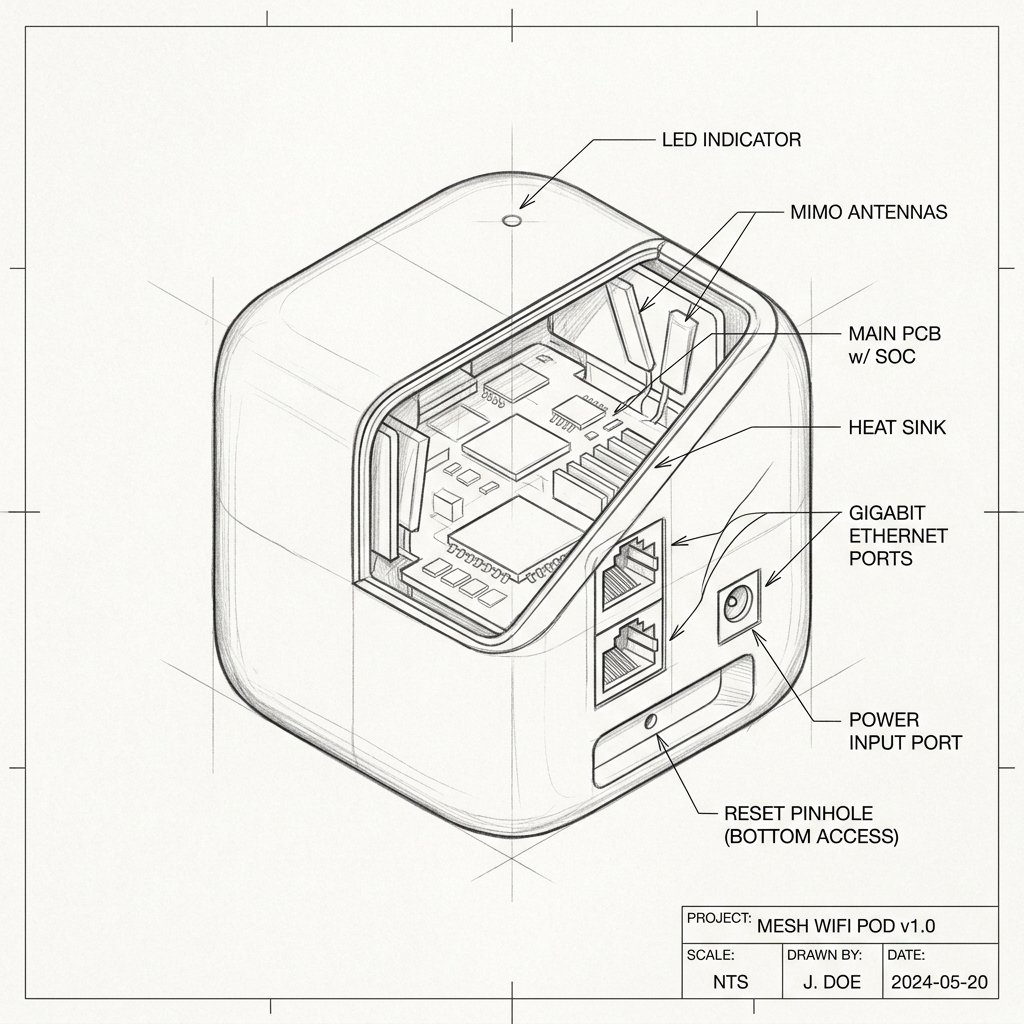
Plume SuperPod Diagram
Reference this technical blueprint during setup to locate the power input, status LED indicators, one-touch WPS pairing button, and Ethernet port on your device.
The Plume SuperPod is a wall‑plug, tri‑band mesh WiFi device that can act as your main router or as a smart extender, using the Plume HomePass app and cloud platform to create an adaptive, self‑optimizing WiFi network across your home.
Quick 3-Step Checklist
- Check service: Make sure you have an active internet connection and, if required by your ISP, an active Plume/HomePass subscription (some ISPs bundle Plume, others require a separate membership).
- Install the app: Download and sign in to the Plume Home / HomePass app on your phone before plugging in SuperPods, so the app can guide setup and placement.
- Plan pod locations: Decide where to plug the gateway SuperPod (near modem/router) and where to place additional pods for coverage—central interior walls, away from heavy obstructions and interference.
Plume SuperPod Overview
- Device type: Mesh WiFi node that can act as router or extender; SuperPod with WiFi 6 models are wall‑plug devices with two Gigabit Ethernet ports and tri‑band radios (2.4 GHz, 5 GHz, 5 GHz).
- Adaptive mesh: Plume uses cloud‑based intelligence (“Plume Adapt”) to continuously optimize channels, band steering, and pod‑to‑pod links based on how devices use your network.
- Management: All configuration, monitoring, parental controls, and network security features are managed exclusively through the Plume/HomePass mobile app, not a traditional web interface.
Reality Check: Did you buy these used? Plume SuperPods are strictly tied to the account that first registered them. If you purchased these from a third-party seller (like eBay or Facebook Marketplace) and the original owner did not delete the pods from their account, they cannot be activated. Plume support cannot bypass this lock for security reasons.
Installing the First Plume SuperPod (Gateway Pod)
The first SuperPod becomes your “gateway” pod, connecting directly to your modem or existing router and starting the new mesh network.
Step 1: Download and Open the Plume App
- On your smartphone, download the Plume Home or HomePass by Plume app from the Apple App Store or Google Play.
- Open the app, create a Plume account or sign in with your existing credentials, and verify your email if prompted.
Step 2: Connect the SuperPod to Your Modem/Router
- Disconnect your old router or gateway from the modem if Plume will take over as the primary WiFi; or leave your existing router if Plume will run in bridge mode, based on your ISP’s instructions.
- Use an Ethernet cable to connect the modem (or router) to one of the SuperPod’s Ethernet ports—this pod will be your gateway pod.
- Plug the SuperPod directly into a wall outlet; the LED should turn on and begin pulsing slowly, indicating it is ready to connect and be discovered by the app.
- Restart your modem (and router, if used) by unplugging power for at least 30–60 seconds, then plugging back in, keeping the Ethernet cable connected to the SuperPod.
Step 3: Create WiFi Name and Password
- Stay close to the gateway SuperPod with your phone; the app will use Bluetooth and cloud discovery to find the pod and confirm connection.
- When the app detects the SuperPod, follow prompts to set up your new WiFi network; choose an SSID (WiFi name) and a secure password.
- Once configured, the app will show the gateway pod with a green check mark; the pod’s LED will stop pulsing and may turn off or go to a steady “connected” state.
Adding Additional SuperPods for Whole‑Home Coverage
After the gateway SuperPod is online, you add more SuperPods around the home to build the mesh and eliminate dead zones.
Step 1: Plug Additional Pods
- Plug a new SuperPod into an outlet in another room where you want better WiFi, ideally on an interior wall, toward the center of your home.
- Avoid placing pods behind large furniture, near metal objects, mirrors, or glass panel walls, which can interfere with signal.
Step 2: Let the App Find and Add Pods
- Keep your phone close to each new pod until the app detects it; the LED will turn on and pulse slowly while the pod connects to the Plume cloud and joins the mesh.
- As each pod connects, you’ll see a green check mark appear for that pod in the app; the LED will stop blinking and turn off, indicating successful connection.
- Repeat for all pods. Plume may suggest moving pods closer or farther from each other based on wireless link quality.
Step 3: Name Pods and Let Optimization Run
- Optionally, use the app to name each pod (e.g., “Living Room,” “Office,” “Bedroom”), by bringing your phone near the pod and following the naming prompts.
- The HomePass/Plume system will then run an optimization phase—adjusting channels, bands, and mesh paths—this may involve brief reboots or updates.
Smart Roaming, SSID, and Old Router WiFi
- Single SSID mesh: All SuperPods share the same WiFi name and password you set during setup, providing seamless roaming; devices automatically connect to the best pod based on signal and load.
- Turning off old WiFi: If Plume replaces your previous WiFi, turn off the old router/gateway’s WiFi radios (using hardware buttons or web UI) after the new Plume network is up to prevent network interference.
Quick Fix Checklist
- Confirm your modem and, if present, router have active internet and DHCP enabled.
- Verify the gateway SuperPod is wired correctly and plugged directly into a powered outlet.
- Ensure your phone is using the Plume/HomePass app, has Bluetooth enabled, and stays close to pods during setup.
- Reposition pods to central interior walls away from obstructions and interference (metal, mirrors, glass).
- If a pod seems stuck, power-cycle the modem and pods. If needed, delete the pod from the app and re-add it from scratch.